Custom Walk in Lucerne, Switzerland by billpin2465 created on 2026-02-25
Guide Location: Switzerland » Lucerne
Guide Type: Custom Walk
# of Sights: 9
Tour Duration: 2 Hour(s)
Travel Distance: 3.7 Km or 2.3 Miles
Share Key: UL5QS
Guide Type: Custom Walk
# of Sights: 9
Tour Duration: 2 Hour(s)
Travel Distance: 3.7 Km or 2.3 Miles
Share Key: UL5QS
How It Works
Please retrieve this walk in the GPSmyCity app. Once done, the app will guide you from one tour stop to the next as if you had a personal tour guide. If you created the walk on this website or come to the page via a link, please follow the instructions below to retrieve the walk in the app.
Retrieve This Walk in App
Step 1. Download the app "GPSmyCity: Walks in 1K+ Cities" on Apple App Store or Google Play Store.
Step 2. In the GPSmyCity app, download(or launch) the guide "Lucerne Map and Walking Tours".
Step 3. Tap the menu button located at upper right corner of the "Walks" screen and select "Retrieve custom walk". Enter the share key: UL5QS
1) Lucerne Railway Station (must see)
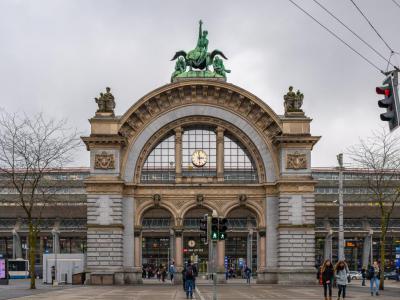
Lucerne Railway Station is not only the city’s main transport hub but also an architectural landmark that blends contemporary design with elements of Lucerne’s past. Rebuilt after the 1971 fire, it features a bright, airy hall shaped by glass, steel, and open space. Just outside on the Train Station Square, you’ll find the monumental stone arch from the original 19th-century station-one of the city’s most photographed historic structures.
As you enter the main concourse, look up to take in the sweeping glass roof designed by the renowned Spanish-Swiss architect Santiago Calatrava. The curved structure creates a sense of openness, almost like stepping into a modern pavilion rather than a traditional station. Sunlight filters through the skylights, casting soft reflections across the hall. Before you move farther, glance toward the right-hand side, where small bakeries and cafés display Swiss pastries and snacks. The ticket hall sits to your left, though most visitors find their attention pulled to the large digital board in the center. As destinations switch across the screen, it offers a glimpse of the day trips, scenic rail rides, and mountain excursions that depart from here.
Before leaving, step outside to the old stone arch on Train Station Square. Look closely at the sculpted figure holding the city’s coat of arms-one of the few surviving details from the historic station.
2) Bourbaki Panorama (must see)
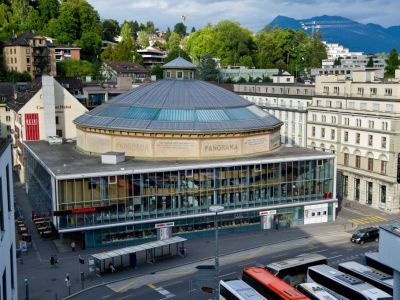
The Bourbaki Panorama is a 360-degree circular painting created in the late nineteenth century, housed in a round building designed specifically for this format. The artwork depicts the winter of 1871, when the French Army of the East retreated into Switzerland during the final phase of the Franco-Prussian War. More than eighty thousand soldiers crossed the border in harsh conditions and were disarmed and sheltered by the Swiss. The painting captures this moment at a scale that surrounds the viewer, blending painted canvas with three-dimensional foreground elements such as snow-covered props and wooden structures.
The artist, Édouard Castres, had served as a Red Cross volunteer during the events he later painted. His direct experience shapes the work’s tone: the figures are shown in exhaustion and uncertainty, and the landscape conveys a sense of cold, heavy air. Castres used detailed observation to portray clothing, medical equipment, sleds, and makeshift shelters. The painting was meant not only as an artistic achievement but also as a record of humanitarian action, emphasizing the support offered by Swiss civilians and officials as they received the retreating army.
The panorama building itself was part of a broader European trend to create immersive visual experiences before the rise of cinema. Its circular form and upper lighting allow the canvas to be seen without visible edges. Visitors stand on a central platform, with the image rising above and below their line of sight. This presentation was intended to blur the boundary between viewer and scene, giving a sense of stepping into the historical moment rather than simply observing it.
In the twentieth century the panorama underwent periods of decline and restoration. Today it is integrated into a cultural complex that includes exhibition areas explaining the historical context and the development of panoramic art. The presentation highlights themes of refuge, neutrality, and humanitarian response, linking the nineteenth-century episode to broader Swiss history. Despite changes in display techniques over time, the core experience remains centered on the immersive quality of Castres’ work and the moment it commemorates.
3) Lion Monument (must see)
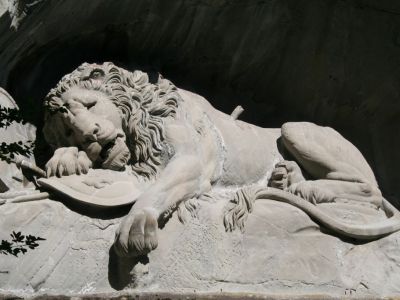
The Lion Monument is a large sandstone relief carved into a former quarry, completed in 1821 to commemorate members of the Swiss Guard who were killed during the events of 1792 at the Tuileries Palace in Paris. The design comes from a model by Danish sculptor Bertel Thorvaldsen and was executed on-site by stonemason Lukas Ahorn. The wounded lion lies within a shallow recess in the rock face, creating a natural frame that emphasizes the contrast between the carved figure and the untouched stone around it. A small pond in front of the monument reflects the sculpture and the surrounding vegetation, giving the site a quiet, enclosed atmosphere.
The lion’s expression and posture shape the meaning of the memorial. The figure is shown collapsing onto a shield marked with the fleur-de-lis, while a second shield bearing the Swiss coat of arms rests nearby. This arrangement refers to the guard’s loyalty to the French monarchy and the heavy losses suffered during the attack on the palace. The sculpted surface is detailed enough to show the texture of the mane and the curvature of the ribs, but the overall composition remains simple, directing attention to the symbolic elements rather than dramatic action.
Above the lion, an inscription records the regiment and the number of officers and soldiers who died, were wounded, or survived. The figures are arranged in a straightforward manner, reflecting the commemorative purpose of the site. Additional carved elements, such as the spear and broken weapons, appear along the edges of the niche, reinforcing the historical context without overwhelming the central image.
Visitors often notice how the setting contributes to the monument’s effect. The surrounding rock, the narrow pool, and the trees create a sense of enclosure that separates the relief from the nearby streets. Because the monument is carved directly into the quarry wall rather than constructed as a freestanding sculpture, it merges with the landscape, giving the impression of a historical marker rooted in the site itself.
The legendary American writer Mark Twain famously referred to the sculpture as "the most mournful and moving piece of stone in the world."
4) Old Swiss House
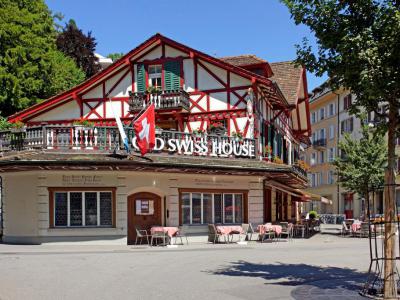
Located in the heart of Lucerne, the Old Swiss House is a renowned symbol of tradition and culinary excellence. This historic half-timbered structure, dating back to 1858, holds a special place in the city, just a short distance from the famous Lion Monument. It attracts visitors from various places, drawing in tour groups with its enticing combination of European cuisine and a strong sense of occasion.
For many people, a visit to the Old Swiss House is an essential part of their Lucerne trip. The restaurant's consistent excellence over the years can be attributed to the devoted Buholzer family, who have lovingly managed it since 1931. With an extensive wine cellar boasting a collection of over 40,000 bottles and a menu featuring signature dishes like Zurich-style veal in a rich cream sauce served with golden rösti, it caters to a wide range of discerning tastes.
However, what truly sets the Old Swiss House apart is its interior. Upon entering, you are transported to the 17th century, surrounded by hand-carved wall panels, solid oak doors, gleaming silverware, captivating oil paintings, stained-glass windows, and a porcelain-tiled stove that all contribute to the restaurant's enchanting decor.
Whether you're a lover of fine dining or simply in search of a historic and traditional meal, the Old Swiss House in Lucerne invites you to savor the past while enjoying the present.
5) Church of St. Leodegar (must see)
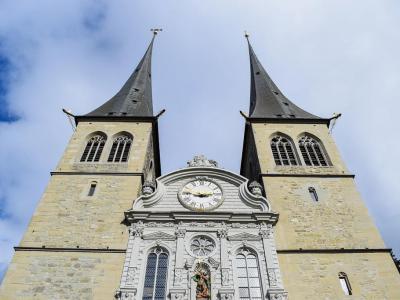
The Church of Saint Leodegar is one of Lucerne’s key landmarks, set on a slight rise above the lakeshore. The current building dates from the 17th century and was constructed after a major fire, but its two slender towers preserve the outline of the earlier medieval church. From the outside, the twin spires, simple front façade, and elevated position make it easy to recognize from across the city and the lake.
Inside, the church is striking for its simplicity. The walls and ceiling are completely white, creating a bright interior that leaves the architectural lines clearly visible. As you look toward the far end of the interior, the high altar made of black marble anchors the space with its darker tone and sculptural detailing. On the left and right sides of the nave, two additional altars sit in recessed areas, each framed by statues, gilded elements, and decorative surrounds that add visual interest without overwhelming the calm interior.
Turn around and look back toward the entrance to see the dark organ above the main doors. Its rich tone and carved case contrast with the white walls, marking the west end of the church and framing the view as you look back down the nave. As you glance along the side walls again, notice how the altars, windows, and simple architectural lines work together without heavy ornament, giving the interior a calm, orderly character.
Outside, the churchyard and surrounding terraces emphasize the building’s slightly elevated position above the lakeside road. The two towers, visible from many points in Lucerne, help orient you as you move around the city and underline the church’s long-standing role as both a spiritual and visual landmark.
6) Chapel Bridge (must see)
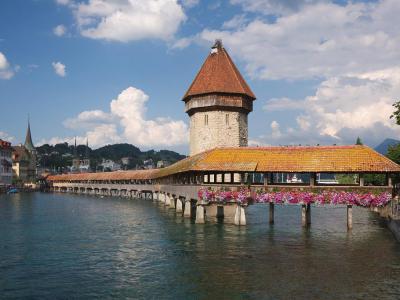
Chapel Bridge crosses the river on a diagonal line, its long wooden structure resting on stone and timber supports. Built in the fourteenth century as part of the city’s fortifications, the bridge originally linked defensive zones on both banks. Its angled route reflects these strategic needs rather than any concern for symmetry. The covered walkway shields travelers from wind and rain, and the sound of the boards underfoot hints at the many cycles of repair that have kept the bridge in use for centuries. The fire of 1993 destroyed a large central portion, but the reconstruction followed surviving plans and incorporated intact elements wherever possible.
As you enter the walkway, look upward at the roof beams. Hanging from them is a sequence of triangular painted panels created in the seventeenth century. These images depict episodes from local history, civic legends, and religious narratives. The panels were meant to be read quickly, offering brief lessons to those crossing the river. Some originals survived the fire and display a darker, weathered tone; others are later replacements painted to match the original style. Their arrangement forms a loose timeline, though many sections were reordered during restoration.
At the midpoint of the bridge stands the Water Tower, a stout octagonal structure older than the bridge itself. Its thick stone walls reveal its former defensive role. Over the centuries it served as an archive, a prison, and a treasury. Although the interior is not part of the regular visitor route, the tower remains central to the bridge’s identity. Its mass anchors the wooden walkway and creates a sharp contrast with the lighter timbers surrounding it.
As you continue across, look to the open side of the walkway for views of rooftops, river reflections, and the movement of boats and swans below. The rhythm of repeating roof supports creates a steady visual pattern, framing each view like a series of windows. The bridge’s mixture of medieval defense, later civic storytelling, and modern conservation shows how the city has adapted a working structure into a landmark.
7) Rathaus (Town Hall)
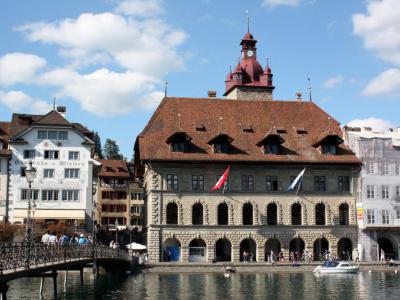
Lucerne’s Town Hall is a solid Renaissance building completed in the early seventeenth century, shaped by Italian design ideas adapted to local materials. Its broad stone base, arcaded ground floor, and steep roof show how practical needs and civic display were combined. The structure was used for council meetings, grain storage, and public gatherings, making it both an administrative and economic center.
If you stand in front of the building, look closely at the arcades along the lower level. Their wide arches once sheltered market activity and still create a clear passageway. Above them, the smooth stone façade rises toward the timber-framed upper section. The transition between stone and wood reflects changing building methods of the period. The projecting roof, with its deep overhang, protects the walls from weather and gives the upper part a heavier presence.
Walk to the side facing the river and look at how the building meets the water’s edge. The position was chosen for easy access to transport routes and to place the hall within sight of trading activity. The tall tower with its clock and small openings served both practical and symbolic purposes, marking time for the town and signaling the presence of local authority. Its shape contrasts with the long roofline, adding vertical emphasis to an otherwise horizontal structure.
Inside, the ceremonial rooms show wooden ceilings, painted coats of arms, and sturdy furnishings. These features reflect the role of the hall as a place for public decisions and guild activities.
8) Spreuer Bridge (must see)
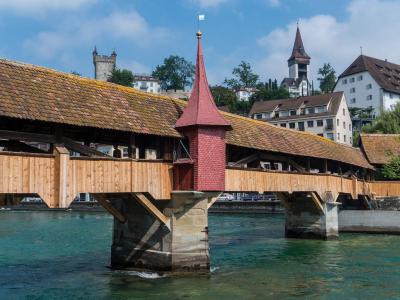
Spreuer Bridge is a covered wooden crossing that bends gently as it spans the river. Built in the early fifteenth century, it once served practical purposes connected to the nearby mills, allowing workers to dispose of chaff into the water, which gave the bridge its name. Its structure shows typical medieval carpentry: heavy beams, angled supports, and a low roof that protects the walkway from weather. The bridge’s slight curve follows the natural flow of the river rather than a straight architectural plan.
Inside the walkway, a sequence of triangular painted panels hangs beneath the roof ridge. Created in the seventeenth century, these paintings form a cycle centered on the Dance of Death, a theme that was common in European art during times of plague and conflict. Each panel pairs death with figures from different levels of society, using simple compositions and direct symbolism. The panels served as moral reminders for the community, presenting a message about shared fate and the fragility of status. Surviving works show their age through darker tones and worn surfaces, while replaced sections reflect careful restoration efforts.
At the midpoint stands a small chapel-like structure embedded into the bridge. This addition, built shortly after the bridge itself, was used for brief prayers and blessings connected to river work and nearby guild activities. Its wooden walls and narrow windows blend with the surrounding structure, but the carved details and small roof set it apart from the rest of the walkway. From here, the roof timbers are easy to study: broad rafters, cross-braces, and wooden pegs that show the joinery techniques of the period.
Continuing across, you can look out through the open sides of the bridge to see the river turning below and the arrangement of rooftops and walls along the banks. The repeating pattern of posts and beams frames the water in alternating light and shadow. The bridge’s combination of medieval carpentry, civic artistic tradition, and later restoration work provides a clear record of how a functional crossing became a visual narrative space.
9) Jesuit Church (Jesuitenkirche) (must see)
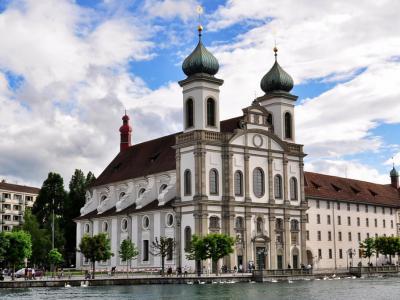
The Jesuit Church stands beside the river as one of the earliest Baroque churches in the region. Its twin onion-shaped towers, curved façade, and pale stucco surfaces mark a shift from earlier, simpler building styles. Inside, the space is shaped by soft light, restrained ornament, and careful use of color. Stucco reliefs frame the nave, and the ceiling frescoes guide the eye along the central axis toward the altar. The church was built by the Jesuit order in the seventeenth century, during a period of renewed emphasis on teaching and religious outreach.
As you enter the nave, look straight ahead toward the high altar. Its gilded details and polished columns form a bright focal point against the otherwise light interior. Now look up at the ceiling: the frescoes show scenes framed by decorative plasterwork, creating the illusion of depth. Take a moment to look right and left at the repeating arched bays. Each one contains a side altar set into its niche, arranged in mirrored positions to maintain the symmetry of the Baroque interior.
Continue walking toward the altar and pause at the midpoint of the nave. Look back toward the entrance to see how the organ gallery sits above the doors. The organ’s case reflects the same stone-like finish as the main altar, allowing it to stand out clearly against the church's white walls. Now face the altar again and look closely at the sculpted figures that flank it. Their poses direct attention upward, linking the altarpiece to the architectural lines of the apse. If you step a little to the right side of the nave, you can also see how the light enters through tall, narrow windows and highlights details of the plasterwork.
Before leaving, spend a moment outside to look up at the towers. Their curved shapes soften the vertical lines of the façade and set the building apart from neighboring structures. The dome-like tops reflect southern architectural influences brought north by Jesuit builders. This mixture of local and imported features gives the church its distinctive profile along the river.
