

Audio Guide: Lucerne Introduction Walking Tour (Self Guided), Lucerne
Lucerne has drawn travelers, writers, and musicians for centuries, often for simple reasons: the lake, the mountains, and a city center that’s easy to walk. Figures like the German composer Richard Wagner lived and worked here, and many 19th-century visitors wrote about Lucerne as a comfortable base for exploring central Switzerland. Their impressions still ring true today-Lucerne is approachable, steady, and built on a scale that suits everyday life.
The name “Lucerne” likely comes from the Latin Luceria or Luciaria, which may be related to the word for “light.” Another theory links it to a small fishing village near the lake. Over time, the name evolved into the German Luzern and the English “Lucerne.” While its exact meaning is debated, the name has long been tied to the lakefront area where the early settlement developed.
Lucerne grew from a Benedictine monastery founded in the 8th century into a trading town that benefited from its location along major north–south routes. By the 14th century, it joined the Swiss Confederation and became an important regional center. Over the centuries that followed, Lucerne experienced political, religious, and economic shifts, including its role as a Catholic stronghold during the Reformation and its rise as a prominent destination for early tourism in the 19th century. Rail connections later strengthened its position as a gateway to central Switzerland.
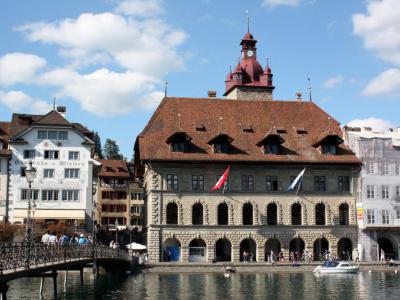
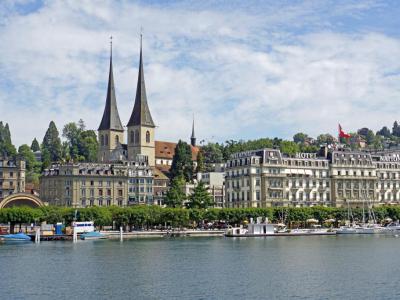
Today, Lucerne blends its medieval layout with modern services and busy pedestrian areas. The old town sits just north of the Reuss River, with narrow streets, painted façades, and small squares that feel unchanged in scale even as the city grows around them. On the south side of the river, the newer areas connect directly to the lake and transportation hubs. The overall pace is calm but active, with a steady flow of visitors and local life mixing throughout the day. Mountain views, especially of Mount Pilatus and the surrounding range, frame many parts of the city.
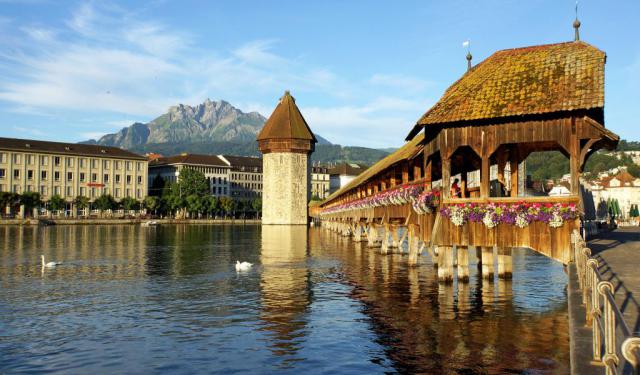
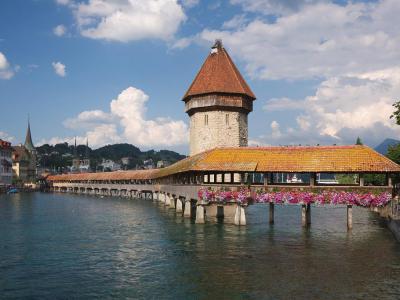
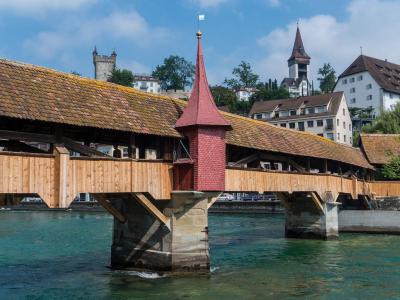
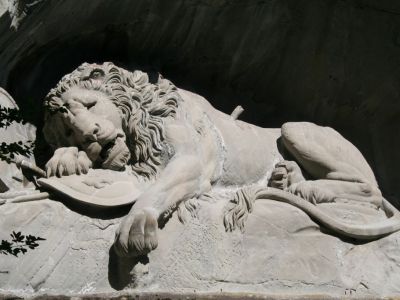
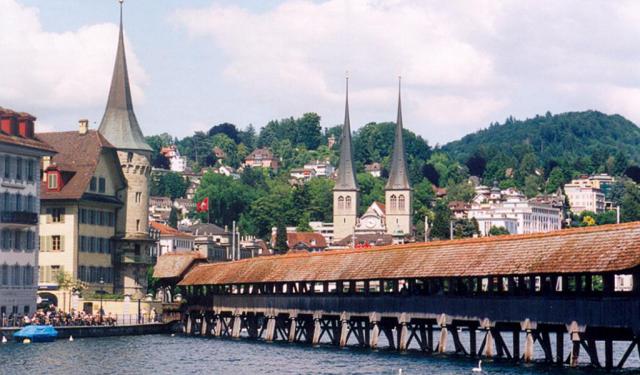
Several places in the center help introduce Lucerne’s character. The Chapel Bridge is one of Switzerland’s most recognized landmarks, with a covered wooden walkway and historic paintings that depict moments from the city’s past. Nearby, the Lion Monument offers another look at Lucerne’s history. Carved into a sandstone cliff in the early 19th century, it commemorates Swiss Guards who died during the French Revolution and has become one of the city’s most visited memorials.
As you walk through Lucerne’s streets, riverfront spots, and small squares, the layout of the city becomes easy to follow. It’s a place where the old and the new fit together comfortably, and where visitors can get a clear sense of how the city works and why people continue to enjoy spending time here.
The name “Lucerne” likely comes from the Latin Luceria or Luciaria, which may be related to the word for “light.” Another theory links it to a small fishing village near the lake. Over time, the name evolved into the German Luzern and the English “Lucerne.” While its exact meaning is debated, the name has long been tied to the lakefront area where the early settlement developed.
Lucerne grew from a Benedictine monastery founded in the 8th century into a trading town that benefited from its location along major north–south routes. By the 14th century, it joined the Swiss Confederation and became an important regional center. Over the centuries that followed, Lucerne experienced political, religious, and economic shifts, including its role as a Catholic stronghold during the Reformation and its rise as a prominent destination for early tourism in the 19th century. Rail connections later strengthened its position as a gateway to central Switzerland.
Today, Lucerne blends its medieval layout with modern services and busy pedestrian areas. The old town sits just north of the Reuss River, with narrow streets, painted façades, and small squares that feel unchanged in scale even as the city grows around them. On the south side of the river, the newer areas connect directly to the lake and transportation hubs. The overall pace is calm but active, with a steady flow of visitors and local life mixing throughout the day. Mountain views, especially of Mount Pilatus and the surrounding range, frame many parts of the city.
Several places in the center help introduce Lucerne’s character. The Chapel Bridge is one of Switzerland’s most recognized landmarks, with a covered wooden walkway and historic paintings that depict moments from the city’s past. Nearby, the Lion Monument offers another look at Lucerne’s history. Carved into a sandstone cliff in the early 19th century, it commemorates Swiss Guards who died during the French Revolution and has become one of the city’s most visited memorials.
As you walk through Lucerne’s streets, riverfront spots, and small squares, the layout of the city becomes easy to follow. It’s a place where the old and the new fit together comfortably, and where visitors can get a clear sense of how the city works and why people continue to enjoy spending time here.
How it works: Download the app "GPSmyCity: Walks in 1K+ Cities" from Apple App Store or Google Play Store to your mobile phone or tablet. The app turns your mobile device into a personal tour guide and its built-in GPS navigation functions guide you from one tour stop to next. The app works offline, so no data plan is needed when traveling abroad.
Download The GPSmyCity App
Lucerne Introduction Walking Tour Map
Guide Name: Lucerne Introduction Walking Tour
Guide Location: Switzerland » Lucerne (See other walking tours in Lucerne)
Guide Type: Self-guided Walking Tour (Sightseeing)
Tour Duration: 2 Hour(s)
Travel Distance: 4.2 Km or 2.6 Miles
Guide Location: Switzerland » Lucerne (See other walking tours in Lucerne)
Guide Type: Self-guided Walking Tour (Sightseeing)
Tour Duration: 2 Hour(s)
Travel Distance: 4.2 Km or 2.6 Miles
Sights Featured in This Walk
2) Rosengart Collection (must see)
4) Chapel Bridge (must see)
6) Spreuer Bridge (must see)
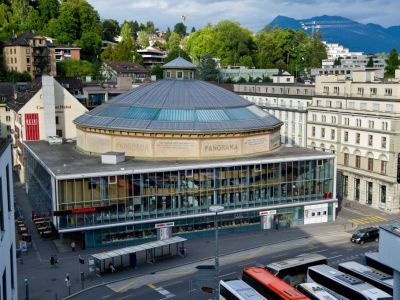
8) Bourbaki Panorama (must see)
10) Glacier Garden (must see)
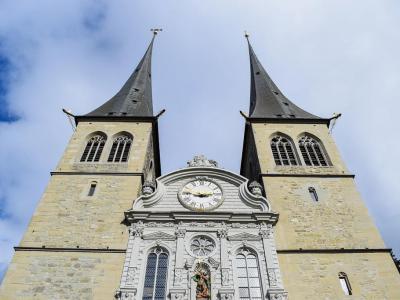
11) Church of St. Leodegar (must see)
Walking Tours in Lucerne, Switzerland
Create Your Own Walk in Lucerne
Creating your own self-guided walk in Lucerne is easy and fun. Choose the city attractions that you want to see and a walk route map will be created just for you. You can even set your hotel as the start point of the walk.
Lucerne's Architectural Jewels Walking Tour
Lucerne's long religious and cultural history is duly reflected in its architecture, making it one of the most popular tourist destinations in Switzerland. There are quite a few places in the city that need not strive for attention and can easily catch the eye of any passer-by. Such like are:
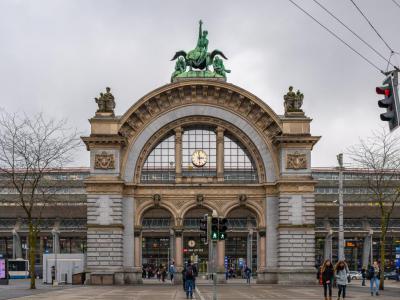
The Lucerne Railway Station – an architectural jewel and main hub of the Swiss railway network,... view more
Tour Duration: 2 Hour(s)
Travel Distance: 2.3 Km or 1.4 Miles
The Lucerne Railway Station – an architectural jewel and main hub of the Swiss railway network,... view more
Tour Duration: 2 Hour(s)
Travel Distance: 2.3 Km or 1.4 Miles
Lucerne's Towers Walking Tour
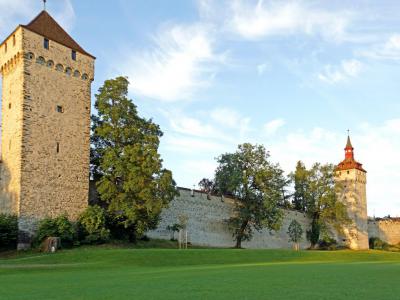
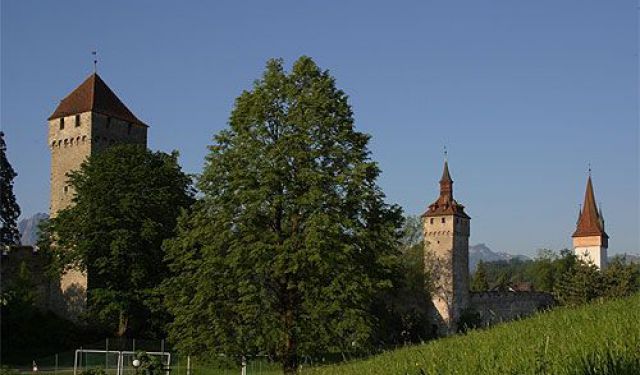
Lucerne boasts a wealth of spectacular medieval towers, located in the Musegg Wall area. This former symbol of power forms an impressive city crown, shaping up its skyline, and affording great panoramic views of Lucerne and the eponymous lake, the Reuss river, and the surrounding mountain scenery.
Built in the 13th-14th centuries, the 870-meter wall, complete with its nine towers, is one of... view more
Tour Duration: 1 Hour(s)
Travel Distance: 1.0 Km or 0.6 Miles
Built in the 13th-14th centuries, the 870-meter wall, complete with its nine towers, is one of... view more
Tour Duration: 1 Hour(s)
Travel Distance: 1.0 Km or 0.6 Miles
The Most Popular Cities
/ view all